Samba を使うと Linux を含む UNIX 系のオペレーティングシステムを Windows のファイルサーバーやプリントサーバーにすることができるソフトウェアです。
Samba を導入すると共有設定を行った Linux サーバーのディレクトリにネットワークを通して Windows クライアントからアクセスすることができます。
Samba のインストール
Samba は apt-get を使ってインストールします。
以下のように root 権限でインストールを行います。

Building dependency tree
Reading state information… Done
The following extra packages will be installed:
libcupsys2 samba-common
Suggested packages:
cupsys-common
Recommended packages:
smbldap-tools
The following NEW packages will be installed:
libcupsys2 samba samba-common
0 upgraded, 3 newly installed, 0 to remove and 1 not upgraded.
Need to get 5956kB of archives.
After unpacking 14.4MB of additional disk space will be used.
Do you want to continue [Y/n]? y
Get:1 http://jp.archive.ubuntu.com feisty/main libcupsys2 1.2.8-0ubuntu8 [178kB]
Get:2 http://security.ubuntu.com feisty-security/main samba-common 3.0.24-2ubuntu1.2 [2437kB]
Get:3 http://security.ubuntu.com feisty-security/main samba 3.0.24-2ubuntu1.2 [3341kB]
Fetched 5956kB in 1m23s (71.2kB/s)
Preconfiguring packages …
Selecting previously deselected package libcupsys2.
(Reading database … 22043 files and directories currently installed.)
Unpacking libcupsys2 (from …/libcupsys2_1.2.8-0ubuntu8_i386.deb) …
Selecting previously deselected package samba-common.
Unpacking samba-common (from …/samba-common_3.0.24-2ubuntu1.2_i386.deb) …
Selecting previously deselected package samba.
Unpacking samba (from …/samba_3.0.24-2ubuntu1.2_i386.deb) …
Setting up libcupsys2 (1.2.8-0ubuntu8) …
Setting up samba-common (3.0.24-2ubuntu1.2) …
Setting up samba (3.0.24-2ubuntu1.2) …
Generating /etc/default/samba…
tdbsam_open: Converting version 0 database to version 3.
account_policy_get: tdb_fetch_uint32 failed for field 1 (min password length), returning 0
account_policy_get: tdb_fetch_uint32 failed for field 2 (password history), returning 0
account_policy_get: tdb_fetch_uint32 failed for field 3 (user must logon to change password), returning 0
account_policy_get: tdb_fetch_uint32 failed for field 4 (maximum password age), returning 0
account_policy_get: tdb_fetch_uint32 failed for field 5 (minimum password age), returning 0
account_policy_get: tdb_fetch_uint32 failed for field 6 (lockout duration), returning 0
account_policy_get: tdb_fetch_uint32 failed for field 7 (reset count minutes), returning 0
account_policy_get: tdb_fetch_uint32 failed for field 8 (bad lockout attempt), returning 0
account_policy_get: tdb_fetch_uint32 failed for field 9 (disconnect time), returning 0
account_policy_get: tdb_fetch_uint32 failed for field 10 (refuse machine password change), returning 0
Importing accout for root…ok
Importing accout for daemon…ok
Importing accout for bin…ok
Importing accout for sys…ok
Importing accout for sync…ok
Importing accout for games…ok
Importing accout for man…ok
Importing accout for lp…ok
Importing accout for mail…ok
Importing accout for news…ok
Importing accout for uucp…ok
Importing accout for proxy…ok
Importing accout for www-data…ok
Importing accout for backup…ok
Importing accout for list…ok
Importing accout for irc…ok
Importing accout for gnats…ok
Importing accout for nobody…ok
Importing accout for dhcp…ok
Importing accout for syslog…ok
Importing accout for klog…ok
Importing accout for taro…ok
Importing accout for sshd…ok
Importing accout for mysql…ok
Importing accout for postgres…ok
Importing accout for ntp…ok
* Starting Samba daemons… [ OK ]
これで Samba のインストールは完了し起動されます。
共有ディレクトリの作成
Samba で共有するディレクトリを作成します。
# sudo chown nobody:nogroup /var/samba
# sudo chmod 777 /var/samba
Samba の設定
Samba をインストールするとデフォルトの設定ファイルが作成されます。
この設定ファイルを編集して上で作成したサーバーのディレクトリを共有できるように設定します。
# Sample configuration file for the Samba suite for Debian GNU/Linux.
#
#
# This is the main Samba configuration file. You should read the
# smb.conf(5) manual page in order to understand the options listed
# here. Samba has a huge number of configurable options most of which
# are not shown in this example
#
# Any line which starts with a ; (semi-colon) or a # (hash)
# is a comment and is ignored. In this example we will use a #
# for commentary and a ; for parts of the config file that you
# may wish to enable
#
# NOTE: Whenever you modify this file you should run the command
# “testparm” to check that you have not made any basic syntactic
# errors.
#
#======================= Global Settings =======================
[global]
## Browsing/Identification ###
# Change this to the workgroup/NT-domain name your Samba server will part of
; workgroup = MSHOME
workgroup = WORKGROUP
dos charset = CP932Windows 側の文字コード
unix charset = UTF-8Linux 側の文字コード
display charset = UTF-8swat で表示される文字コード
map to guest = Bad UserLinux に存在しないユーザーでのアクセスはゲストとして扱う
# server string is the equivalent of the NT Description field
server string = %h server (Samba, Ubuntu)
# Windows Internet Name Serving Support Section:
# WINS Support – Tells the NMBD component of Samba to enable its WINS Server
; wins support = no
# WINS Server – Tells the NMBD components of Samba to be a WINS Client
# Note: Samba can be either a WINS Server, or a WINS Client, but NOT both
; wins server = w.x.y.z
# This will prevent nmbd to search for NetBIOS names through DNS.
dns proxy = no
# What naming service and in what order should we use to resolve host names
# to IP addresses
; name resolve order = lmhosts host wins bcast
#### Networking ####
# The specific set of interfaces / networks to bind to
# This can be either the interface name or an IP address/netmask;
# interface names are normally preferred
; interfaces = 127.0.0.0/8 eth0
# Only bind to the named interfaces and/or networks; you must use the
# ‘interfaces’ option above to use this.
# It is recommended that you enable this feature if your Samba machine is
# not protected by a firewall or is a firewall itself. However, this
# option cannot handle dynamic or non-broadcast interfaces correctly.
; bind interfaces only = true
#### Debugging/Accounting ####
# This tells Samba to use a separate log file for each machine
# that connects
log file = /var/log/samba/log.%m
# Put a capping on the size of the log files (in Kb).
max log size = 1000
# If you want Samba to only log through syslog then set the following
# parameter to ‘yes’.
; syslog only = no
# We want Samba to log a minimum amount of information to syslog. Everything
# should go to /var/log/samba/log.{smbd,nmbd} instead. If you want to log
# through syslog you should set the following parameter to something higher.
syslog = 0
# Do something sensible when Samba crashes: mail the admin a backtrace
panic action = /usr/share/samba/panic-action %d
####### Authentication #######
# “security = user” is always a good idea. This will require a Unix account
# in this server for every user accessing the server. See
# /usr/share/doc/samba-doc/htmldocs/Samba3-HOWTO/ServerType.html
# in the samba-doc package for details.
; security = user
# You may wish to use password encryption. See the section on
# ‘encrypt passwords’ in the smb.conf(5) manpage before enabling.
encrypt passwords = true
# If you are using encrypted passwords, Samba will need to know what
# password database type you are using.
passdb backend = tdbsam
obey pam restrictions = yes
; guest account = nobody
invalid users = root
# This boolean parameter controls whether Samba attempts to sync the Unix
# password with the SMB password when the encrypted SMB password in the
# passdb is changed.
; unix password sync = no
# For Unix password sync to work on a Debian GNU/Linux system, the following
# parameters must be set (thanks to Ian Kahan <
# sending the correct chat script for the passwd program in Debian Sarge).
passwd program = /usr/bin/passwd %u
passwd chat = *Enter\snew\sUNIX\spassword:* %n\n *Retype\snew\sUNIX\spassword:* %n\n *password\supdated\ssuccessfully* .
# This boolean controls whether PAM will be used for password changes
# when requested by an SMB client instead of the program listed in
# ‘passwd program’. The default is ‘no’.
; pam password change = no
########## Domains ###########
# Is this machine able to authenticate users. Both PDC and BDC
# must have this setting enabled. If you are the BDC you must
# change the ‘domain master’ setting to no
#
; domain logons = yes
#
# The following setting only takes effect if ‘domain logons’ is set
# It specifies the location of the user’s profile directory
# from the client point of view)
# The following required a [profiles] share to be setup on the
# samba server (see below)
; logon path = \%N\profiles\%U
# Another common choice is storing the profile in the user’s home directory
; logon path = \%N\%U\profile
# The following setting only takes effect if ‘domain logons’ is set
# It specifies the location of a user’s home directory (from the client
# point of view)
; logon drive = H:
; logon home = \%N\%U
# The following setting only takes effect if ‘domain logons’ is set
# It specifies the script to run during logon. The script must be stored
# in the [netlogon] share
# NOTE: Must be store in ‘DOS’ file format convention
; logon script = logon.cmd
# This allows Unix users to be created on the domain controller via the SAMR
# RPC pipe. The example command creates a user account with a disabled Unix
# password; please adapt to your needs
; add user script = /usr/sbin/adduser –quiet –disabled-password –gecos “” %u
########## Printing ##########
# If you want to automatically load your printer list rather
# than setting them up individually then you’ll need this
; load printers = yes
# lpr(ng) printing. You may wish to override the location of the
# printcap file
; printing = bsd
; printcap name = /etc/printcap
# CUPS printing. See also the cupsaddsmb(8) manpage in the
# cupsys-client package.
; printing = cups
; printcap name = cups
# When using [print$], root is implicitly a ‘printer admin’, but you can
# also give this right to other users to add drivers and set printer
# properties
; printer admin = @lpadmin
############ Misc ############
# Using the following line enables you to customise your configuration
# on a per machine basis. The %m gets replaced with the netbios name
# of the machine that is connecting
; include = /home/samba/etc/smb.conf.%m
# Most people will find that this option gives better performance.
# See smb.conf(5) and /usr/share/doc/samba-doc/htmldocs/Samba3-HOWTO/speed.html
# for details
# You may want to add the following on a Linux system:
# SO_RCVBUF=8192 SO_SNDBUF=8192
socket options = TCP_NODELAY
# The following parameter is useful only if you have the linpopup package
# installed. The samba maintainer and the linpopup maintainer are
# working to ease installation and configuration of linpopup and samba.
; message command = /bin/sh -c ‘/usr/bin/linpopup “%f” “%m” %s; rm %s’ &
# Domain Master specifies Samba to be the Domain Master Browser. If this
# machine will be configured as a BDC (a secondary logon server), you
# must set this to ‘no’; otherwise, the default behavior is recommended.
; domain master = auto
# Some defaults for winbind (make sure you’re not using the ranges
# for something else.)
; idmap uid = 10000-20000
; idmap gid = 10000-20000
; template shell = /bin/bash
#======================= Share Definitions =======================
# Un-comment the following (and tweak the other settings below to suit)
# to enable the default home directory shares. This will share each
# user’s home directory as \server\username
;[homes]
; comment = Home Directories
; browseable = no
# By default, \server\username shares can be connected to by anyone
# with access to the samba server. Un-comment the following parameter
# to make sure that only “username” can connect to \server\username
; valid users = %S
# By default, the home directories are exported read-only. Change next
# parameter to ‘yes’ if you want to be able to w
ite to them.
; writable = no
# File creation mask is set to 0600 for security reasons. If you want to
# create files with group=rw permissions, set next parameter to 0664.
; create mask = 0600
# Directory creation mask is set to 0700 for security reasons. If you want to
# create dirs. with group=rw permissions, set next parameter to 0775.
; directory mask = 0700
# Un-comment the following and create the netlogon directory for Domain Logons
# (you need to configure Samba to act as a domain controller too.)
;[netlogon]
; comment = Network Logon Service
; path = /home/samba/netlogon
; guest ok = yes
; writable = no
; share modes = no
# Un-comment the following and create the profiles directory to store
# users profiles (see the “logon path” option above)
# (you need to configure Samba to act as a domain controller too.)
# The path below should be writable by all users so that their
# profile directory may be created the first time they log on
;[profiles]
; comment = Users profiles
; path = /home/samba/profiles
; guest ok = no
; browseable = no
; create mask = 0600
; directory mask = 0700
[printers]
comment = All Printers
browseable = no
path = /var/spool/samba
printable = yes
public = no
writable = no
create mode = 0700
# Windows clients look for this share name as a source of downloadable
# printer drivers
[print$]
comment = Printer Drivers
path = /var/lib/samba/printers
browseable = yes
read only = yes
guest ok = no
# Uncomment to allow remote administration of Windows print drivers.
# Replace ‘ntadmin’ with the name of the group your admin users are
# members of.
; write list = root, @ntadmin
# A sample share for sharing your CD-ROM with others.
;[cdrom]
; comment = Samba server’s CD-ROM
; writable = no
; locking = no
; path = /cdrom
; public = yes
# The next two parameters show how to auto-mount a CD-ROM when the
# cdrom share is accesed. For this to work /etc/fstab must contain
# an entry like this:
#
# /dev/scd0 /cdrom iso9660 defaults,noauto,ro,user 0 0
#
# The CD-ROM gets unmounted automatically after the connection to the
#
# If you don’t want to use auto-mounting/unmounting make sure the CD
# is mounted on /cdrom
#
; preexec = /bin/mount /cdrom
; postexec = /bin/umount /cdrom
[share]共有するディレクトリ名
path = /var/samba共有ディレクトリのパス
writeable = yes書き込み許可
force create mode = 0666ファイル作成時のファイルのパーミッション
force directory mode = 0777ディレクトリ作成時のディレクトリのパーミッション
guest ok = yesゲストユーザーを許可
guest only = yesゲストユーザーのみ接続可
Samba の再起動と動作確認
Samba を再起動して設定の変更を有効にします。
* Starting Samba daemons… [ OK ]
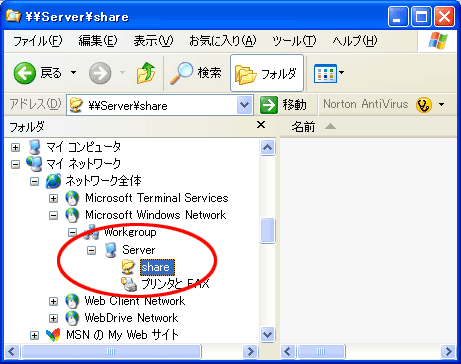
Windows クライアントから Samba サーバーに接続してみましょう。
以下のように舞ネットワークに Samba サーバーが表示されれば正しく動作しています。
ファイルの作成、編集、削除などを実行してみましょう。