Apache HTTP Server はインターネット上で Web ページを公開するための Web サーバーソフトウェアです。
Apache HTTP Server を構築するとその自宅や会社からホームページを公開することができるようになり、レンタルサーバーによくある容量制限や CGI 使用可否などに悩まされることなくウェブサイトを公開することができるようになります。
この Apache HTTP Server は世界一のシェアを誇り、高性能かつ信頼性の高い Web サーバーソフトウェアとして多くの支持を得ています。
Apache HTTP Server はかつて主流であった 1.3 系が新しく開発され 2.0 系となりましたが、ここでは現在最新の 2.2 系での解説となります。
Apache HTTP Server のインストール
Apache HTTP Server は apt-get を使ってインストールします。
以下のように root 権限でインストールを行います。

Building dependency tree
Reading state information… Done
The following extra packages will be installed:
apache2-mpm-worker apache2-utils apache2.2-common libapr1 libaprutil1
libexpat1 libpcre3 libpq5
The following NEW packages will be installed:
apache2 apache2-mpm-worker apache2-utils apache2.2-common libapr1
libaprutil1 libexpat1 libpcre3 libpq5
0 upgraded, 9 newly installed, 0 to remove and 1 not upgraded.
Need to get 2375kB of archives.
After unpacking 6627kB of additional disk space will be used.
Do you want to continue [Y/n]? y

Get:1 http://security.ubuntu.com feisty-security/main libpq5 8.2.4-0ubuntu0.7.04 [223kB]
Get:2 http://security.ubuntu.com feisty-security/main apache2-utils 2.2.3-3.2ubuntu0.1 [340kB]
Get:3 http://security.ubuntu.com feisty-security/main apache2.2-common 2.2.3-3.2ubuntu0.1 [930kB]
Get:4 http://jp.archive.ubuntu.com feisty/main libapr1 1.2.7-8.1 [109kB]
Get:5 http://jp.archive.ubuntu.com feisty/main libexpat1 1.95.8-3.4build1 [63.8kB]
Get:6 http://jp.archive.ubuntu.com feisty/main libaprutil1 1.2.7+dfsg-2build1 [70.2kB]
Get:7 http://jp.archive.ubuntu.com feisty/main libpcre3 6.7-1ubuntu2 [167kB]
Get:8 http://security.ubuntu.com feisty-security/main apache2-mpm-worker 2.2.3-3.2ubuntu0.1 [432kB]
Get:9 http://security.ubuntu.com feisty-security/main apache2 2.2.3-3.2ubuntu0.1 [38.7kB]
Fetched 2375kB in 34s (69.6kB/s)
Selecting previously deselected package libapr1.
(Reading database … 17105 files and directories currently installed.)
Unpacking libapr1 (from …/libapr1_1.2.7-8.1_i386.deb) …
Selecting previously deselected package libexpat1.
Unpacking libexpat1 (from …/libexpat1_1.95.8-3.4build1_i386.deb) …
Selecting previously deselected package libpq5.
Unpacking libpq5 (from …/libpq5_8.2.4-0ubuntu0.7.04_i386.deb) …
Selecting previously deselected package libaprutil1.
Unpacking libaprutil1 (from …/libaprutil1_1.2.7+dfsg-2build1_i386.deb) …
Selecting previously deselected package libpcre3.
Unpacking libpcre3 (from …/libpcre3_6.7-1ubuntu2_i386.deb) …
Selecting previously deselected package apache2-utils.
Unpacking apache2-utils (from …/apache2-utils_2.2.3-3.2ubuntu0.1_i386.deb) …
Selecting previously deselected package apache2.2-common.
Unpacking apache2.2-common (from …/apache2.2-common_2.2.3-3.2ubuntu0.1_i386.deb) …
Selecting previously deselected package apache2-mpm-worker.
Unpacking apache2-mpm-worker (from …/apache2-mpm-worker_2.2.3-3.2ubuntu0.1_i386.deb) …
Selecting previously deselected package apache2.
Unpacking apache2 (from …/apache2_2.2.3-3.2ubuntu0.1_all.deb) …
Setting up libapr1 (1.2.7-8.1) …
Setting up libexpat1 (1.95.8-3.4build1) …
Setting up libpq5 (8.2.4-0ubuntu0.7.04) …
Setting up libaprutil1 (1.2.7+dfsg-2build1) …
Setting up libpcre3 (6.7-1ubuntu2) …
Setting up apache2-utils (2.2.3-3.2ubuntu0.1) …
Setting up apache2.2-common (2.2.3-3.2ubuntu0.1) …
Setting Apache2 to Listen on port 80. If this is not desired, please edit /etc/apache2/ports.conf as desired. Note that the Port directive no longer works.
Module alias installed; run /etc/init.d/apache2 force-reload to enable.
Module autoindex installed; run /etc/init.d/apache2 force-reload to enable.
Module dir installed; run /etc/init.d/apache2 force-reload to enable.
Module env installed; run /etc/init.d/apache2 force-reload to enable.
Module mime installed; run /etc/init.d/apache2 force-reload to enable.
Module negotiation installed; run /etc/init.d/apache2 force-reload to enable.
Module setenvif installed; run /etc/init.d/apache2 force-reload to enable.
Module status installed; run /etc/init.d/apache2 force-reload to enable.
Module auth_basic installed; run /etc/init.d/apache2 force-reload to enable.
Module authz_default installed; run /etc/init.d/apache2 force-reload to enable.
Module authz_user installed; run /etc/init.d/apache2 force-reload to enable.
Module authz_groupfile installed; run /etc/init.d/apache2 force-reload to enable.
Module authn_file installed; run /etc/init.d/apache2 force-reload to enable.
Module authz_host installed; run /etc/init.d/apache2 force-reload to enable.
Setting up apache2-mpm-worker (2.2.3-3.2ubuntu0.1) …
* Starting web server (apache2)… [ OK ]
Setting up apache2 (2.2.3-3.2ubuntu0.1) …
これで Apache HTTP Server のインストールは完了し起動されます。
Apache HTTP Server の動作確認
ブラウザを使って Apache HTTP Server が正しくインストールされ、動作しているかを確認することができます。
ブラウザの URL 入力欄に http://192.168.0.2/apache2-default/ と入力してテストページにアクセスしてみましょう。
以下のように表示されていれば Apache HTTP Server は正しくインストールされています。

メインサイトの作成
Apache HTTP Server をインストール直後はデフォルトサイト http://192.168.0.2/apache2-default/ が存在しますが、これを無効にしてメインサイトを公開するための設定を行います。
サイト毎の設定は /etc/apache2/sites-available ディレクトリ以下に配置します。
先ほどのデフォルトサイトもこのディレクトリにあります。
まずはメインサイト用の設定ファイルを作成します。

<VirtualHost *>
ServerAdmin webmaster@ubuntud.com管理者のメールアドレス
DocumentRoot /var/ubuntud.com/public_html公開するドキュメントディレクトリ
ServerName ubuntud.comサーバーのホスト名
ErrorLog "/var/ubuntud.com/logs/error_log"エラーログを記録するファイル
CustomLog "/var/ubuntud.com/logs/access_log" combinedアクセスログを記録するファイル
<Directory "/virtual/ubuntud.com/public_html">公開ディレクトリに関する設定
Options None
AllowOverride None
Order allow,deny
Allow from all
</Directory>
</VirtualHost>
以下のコマンドを実行して default サイトを無効にして main サイトを有効にします。

$ sudo a2ensite main

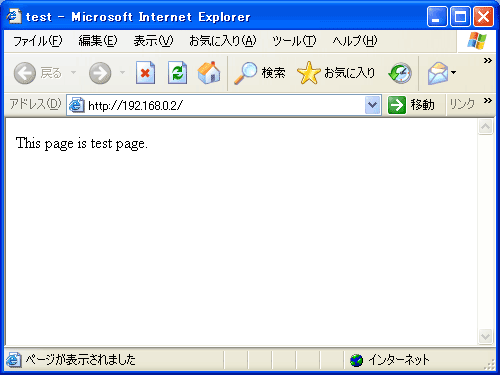
main サイトにテストページを配置してみましょう。
公開ディレクトリとログファイルを格納するディレクトリを作成します。さらに以下のような簡単な HTML ファイルを作成して公開するウェブページを作成します。

$ sudo mkdir -p /var/ubuntud.com/logs

$ sudo vi /var/ubuntud.com/public_html/index.html

<head>
<title>test</title>
</head>
<body>This page is test page.</body>
</html>
最後に Apache HTTP Server を再起動して設定の変更を有効にします。

[ OK ]
これで main サイトが閲覧できるようになっています。
ウェブブラウザを使って http://192.168.0.2/ にアクセスしてページが表示されるか確認してみましょう。

